Assembly reference
Assembling a ride-on toy
Most are 80% pre-assembled and take twenty to sixty minutes. Here is what you actually need, and the three steps that cause most of the problems people blame on the vehicle.
Written by
Mike M. · owner, Iron Mako Media
Published November 2, 2026 · specs checked against each maker’s current listing
Price checked November 8, 2026
Verdict first
Quick picks
Most are 80% pre-assembled and take twenty to sixty minutes. Here is what you actually need, and the three steps that cause most of the problems people blame on the vehicle.. Tap any row to jump to that model’s full write-up below, or go straight to Amazon from the price column. Prices last checked November 8, 2026.
| # | Product | Best for | Score | Price |
|---|---|---|---|---|
| 1 |  Maybird 12V Dodge Durango Pursuit Police Car Fastest stated build | Age 3+, graduated speed control | 8.6out of 10 | $164.99Amazon #ad disclosure |
| 2 | 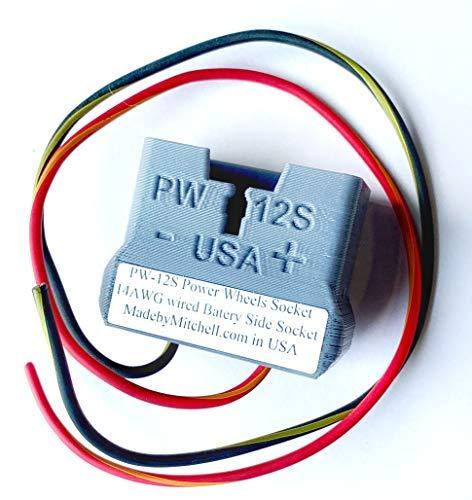 PW-12S Battery Connector for 12V Power Wheels (14AWG) For a connector mismatch | Fitting a generic SLA to Power Wheels | 8.0out of 10 | $11.99Amazon #ad disclosure |
| 3 | 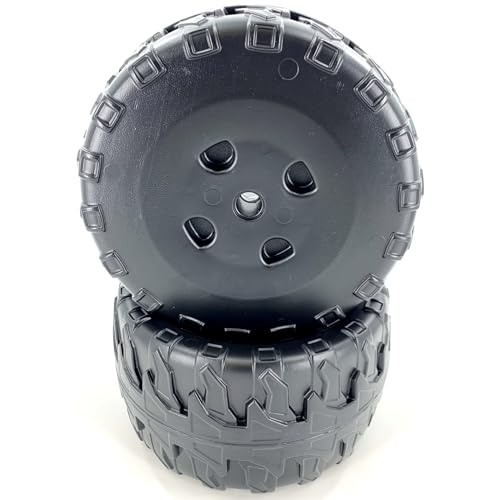 Replacement Wheel/Tire 2-Pack for 12V Power Wheels Jeep Wrangler If a wheel retainer is missing | Wrangler/Rubicon 2014+ wheels | 8.2out of 10 | $45.60Amazon #ad disclosure |
Scores are our own editorial ratings against the published rubric on how we pick. They are not customer ratings and they are not Amazon’s.
Ride-ons arrive substantially built. The body, the drivetrain and the wiring are done; what is left is wheels, steering column, seat, decals and the bits that would not fit in the box. None of it is difficult, and almost all of the frustration comes from three specific steps.
Time
How long it actually takes
Only one listing in our registry publishes an assembly time — 20 minutes, with 80% of components pre-installed, plus video and printed guides. Treat that as a best case with everything to hand. Realistically:
- 6V toddler vehicle: 15 to 30 minutes. Wheels, handlebars or steering wheel, seat.
- 12V single-seat car: 30 to 60 minutes. Add doors, mirrors, windscreen, decals.
- 24V two-seater: 60 to 90 minutes. Bigger panels, a roll bar or roof, two seats, two belts.
- Dirt bike: 20 to 40 minutes, but add time for setting the chain tension and the brake, which are adjustments rather than assembly.
Add the first charge, which on a lead-acid vehicle is 8 to 12 hours and sometimes 10 to 12 for the first one. That is the part that catches people out on a birthday morning.
Tools
What you need
- Phillips screwdriver. The only genuinely essential tool. A #2 fits nearly everything.
- Pliers. For pushing on wheel retainer caps and for the cotter pins on some steering linkages.
- A cordless driver, on its lowest torque setting. Helpful for the dozens of self-tapping screws. On full torque it will strip the plastic bosses, which cannot be repaired — if in doubt, finish by hand.
- A small adjustable wrench for wheel nuts on larger vehicles.
- Scissors or a craft knife for the packaging, and somewhere to put the small parts so they do not get thrown out with it. Lost hardware is the most common assembly failure and it is almost always in the box.
The three steps
The parts people get wrong
1. Wheel retainers
Most ride-on wheels are held on by a push-fit cap, a split pin, or a nut with a plastic cover. All of them need to be fully seated, and the push-fit caps in particular take more force than feels right — people stop early, assuming they have the wrong part. Use pliers, push until it clicks home, and then try to pull the wheel off. If it moves, the cap is not seated.
A wheel that comes off while the vehicle is moving is the most serious assembly failure there is. If a retainer is missing from the box, do not improvise — the correct parts are available by manufacturer part number, see replacement parts by brand.
2. Steering alignment
The steering wheel goes on last, and it goes on in whatever rotational position you choose. Set the front wheels dead straight before you fit it, then fit the wheel with its spokes level. Get this wrong and the vehicle permanently pulls to one side, which every parent then attributes to a drivetrain fault.
3. The first charge
Not optional and not shortenable. A new sealed lead-acid battery has sat partially discharged in a warehouse, and the first full charge sets its usable capacity for life. Two listings in our registry publish a longer first-charge figure specifically — 10 to 12 hours against 8 to 12 subsequently. Charge it the night before. If you have already done the impatient version, a full overnight charge before the second use recovers most of it. See run time and charging.
Decals
A note on stickers
The decals are the fiddliest part and the one children care about most. Two things help: clean and dry the surface first, and position large decals with a few millimeters of air under them before pressing from the center outwards. On a cold day, warm them in your hands — cold vinyl will not conform to a curve and will lift at the edges within a week. If the sheet includes a numbered diagram, follow it; some decals only fit one specific panel.
Every pick in full
The picks, in detail
Each entry below carries the same nine specifications, taken from that model’s own current listing. Rows reading not stated by maker are specs the manufacturer does not publish — we show the gap rather than filling it in.
#1 · Fastest stated build
8.6 / 10
Maybird 12V Dodge Durango Pursuit Police Car
Maybird
The clearest speed disclosure of any 12V car here: three named remote speeds (1.9, 2.5 and 3.1 mph) rather than a vague 3-speed claim.
80% pre-installed with a stated 20-minute build and both video and printed guides. Almost nobody publishes an assembly time, and this one does.
The nine specs
Source: the manufacturer's own published specifications on the current Amazon listing.
Our scoring
- Assembly ease9.5
- Spec disclosure9.5
- Value8.0
- Instructions9.0
What works
- Every remote speed step is published as a number
- Remote has a high-priority emergency brake
- Run time stated with the speed it applies to — almost nobody does this
- 80% pre-assembled; stated 20-minute build
What doesn’t
- Charge time is not published
- No amp-hour figure
- The 90-minute figure is the low-speed run time, not the 3.1 mph one
#2 · For a connector mismatch
8.0 / 10
PW-12S Battery Connector for 12V Power Wheels (14AWG)
Made by Mitchell
#ad · Price as of November 8, 2026 · how this is funded
The gray Power Wheels connector pre-wired in 14AWG — what you need to fit a standard SLA battery to a Power Wheels vehicle.
If you are fitting a generic battery to a Power Wheels vehicle during assembly, this is the pre-wired gray connector that makes it a plug-in rather than a splice.
The nine specs
Source: the manufacturer's own published specifications on the current Amazon listing.
Our scoring
- Compatibility9.0
- Value8.5
- Spec disclosure7.5
- Instructions7.0
What works
- Lets you use a cheap standard SLA battery in a Power Wheels vehicle
- 14AWG wire, heavy enough for a 12V ride-on
- Genuine PS-12S equivalent part number
- Pre-wired, so no crimping tools needed
What doesn’t
- You still fit the terminals to the battery yourself
- Wire length not published
- Done wrong, a battery connector is a fire risk — read the polarity twice
#3 · If a wheel retainer is missing
8.2 / 10
Replacement Wheel/Tire 2-Pack for 12V Power Wheels Jeep Wrangler
Impact Battery
#ad · Price as of November 8, 2026 · how this is funded
Carries the Fisher-Price part number (BCK85-2659) and the model year it fits — the only way to be sure a ride-on wheel fits.
Missing or broken wheel retainers are the commonest assembly-stage complaint. These carry the manufacturer part number and the model years they fit.
The nine specs
Source: the manufacturer's own published specifications on the current Amazon listing.
Our scoring
- Compatibility9.5
- Value7.5
- Spec disclosure9.0
- Urgency8.5
What works
- Fisher-Price part number published, not just 'fits Power Wheels'
- Model year qualified (2014 or later)
- Sold as a pair, which is how they wear
- Direct swap, no modification
What doesn’t
- Only fits the named vehicles and years
- Dimensions and tread depth not published
- Two wheels costs a noticeable share of a cheap vehicle's price
Questions parents ask
Frequently asked questions
How long does it take to assemble a ride-on car?
What tools do I need to build a ride-on toy?
Why does my new ride-on pull to one side?
Do I have to charge a new ride-on before using it?
A part is missing from my ride-on. What should I do?
Where these numbers come from
Sources
- CPSC safety guides and education materials
- ASTM F963 — Standard Consumer Safety Specification for Toy Safety
Product specifications on this page are taken from each manufacturer’s own published listing. Where a manufacturer does not publish a figure, the row reads “not stated by maker” rather than carrying an estimate.
Read next